728x90
[React] Next.js에서 Quill 에디터 사용하기
이 글에는 Next.js에서 react-quill의 사용 없이 Quill 에디터를 사용하기 위한 코드를 제공합니다. 코드의 부족한 점과 문의 사항은 댓글 주시면 답변 및 수정하도록 하겠습니다. 샘플 프로젝트 다운
constructionsite.tistory.com
위 블로그를 참고하여 Next.js에 Quill을 적용하여 Editor를 만들었다.
예제에서 .css 부분은 styled-components로 대체하였다.
(특별한 이유가 있는 건 아니고 그냥 내가 styled-components를 사용하는 게 편해서 바꿨다.)
// pages/editor_test.js

import Head from "next/head";
import { useState } from "react";
import QuillEditor from "../elements/nav/Notice/QuillEditor";
import styled from "styled-components";

const Test = () => {

  const [body, setBody] = useState(""); // Quill 에디터의 innerHTML을 담는 state
  const [mountBody, setMountBody] = useState(false); // 리렌더링 용도 state

  return (
    <Style>
      <Head>
        {/* 관련된 리소스 로드 */}
        <link
          href="//cdn.jsdelivr.net/npm/katex@0.13.3/dist/katex.min.css"
          rel="stylesheet"
        />
        <script src="//cdn.jsdelivr.net/npm/katex@0.13.3/dist/katex.min.js"></script>
        <script src="//cdn.jsdelivr.net/gh/highlightjs/cdn-release@10.7.2/build/highlight.min.js"></script>
        <script src="//cdn.quilljs.com/1.3.6/quill.min.js"></script>
        <link
          rel="stylesheet"
          href="//cdn.jsdelivr.net/gh/highlightjs/cdn-release@10.7.2/build/styles/default.min.css"
        />
        <link rel="stylesheet" href="//cdn.quilljs.com/1.3.6/quill.snow.css" />
      </Head>

      <div style={{ width: "50%", marginTop: "40px" }}>
        <QuillEditor
          body={body}
          handleQuillChange={setBody}
          mountBody={mountBody}
        />
      </div>
      <hr />
      <div style={{ width: "80%" }}>
        <p>body state 미리보기</p>
        {body}
      </div>
    </Style>
  );
};

const Style = styled.div`
  .container {
    min-height: 100vh;
    padding: 0 0.5rem;
    display: flex;
    flex-direction: column;
    justify-content: center;
    align-items: center;
  }

  .title {
    margin: 0;
    line-height: 1.15;
    font-size: 4rem;
  }

  .description {
    line-height: 1.5;
    font-size: 1.5rem;
  }
`;

export default Test;
아래 파일은 예제와 동일하다.
// elements/nav/notice/auillEditor.js

import { useState, useEffect, useRef } from "react";

const QuillEditor = ({ body, handleQuillChange, mountBody }) => {
  const quillElement = useRef();
  const quillInstance = useRef();

  const [isError, setIsError] = useState(false);
  const [isLoaded, setIsLoaded] = useState(false);

  useEffect(() => {
    if (isLoaded) {
      /* isLoaded가 true인 상태에서 rerenderBody를 통해 body 적용시 Quill 초기화 없이
               innerHTML만 body로 바꿉니다. 이 조건이 없을 시 툴바가 중복되어 여러 개 나타나게
               됩니다. */
      const quill = quillInstance.current;
      quill.root.innerHTML = body;
      return;
    }
    if (quillElement.current && window.Quill) {
      /* isLoaded가 false일 때는 Quill을 초기화합니다. */

      /* Quill 옵션을 원하는 대로 수정하세요. */
      const toolbarOptions = {
        container: [
          [{ size: ["small", false, "large", "huge"] }], // custom dropdown
          [{ header: [1, 2, 3, 4, 5, 6, false] }],
          [{ align: [] }],
          ["bold", "italic", "underline", "strike"], // toggled buttons
          [{ color: [] }, { background: [] }], // dropdown with defaults from theme
          [{ header: 1 }, { header: 2 }], // custom button values
          [{ list: "ordered" }, { list: "bullet" }],
          [{ script: "sub" }, { script: "super" }], // superscript/subscript
          [{ indent: "-1" }, { indent: "+1" }], // outdent/indent
          [{ direction: "rtl" }], // text direction
          ["clean"], // remove formatting button
          ["blockquote", "link", "code-block", "formula", "image", "video"], // media
        ],
      };

      quillInstance.current = new window.Quill(quillElement.current, {
        modules: {
          history: {
            delay: 2000,
            maxStack: 500,
            userOnly: true,
          },
          syntax: true,
          toolbar: toolbarOptions,
        },
        placeholder: "본문 입력",
        theme: "snow",
      });

      const quill = quillInstance.current;

      quill.root.setAttribute("spellcheck", "false");

      // 초기 body state 적용
      quill.root.innerHTML = body;

      /* quill에서 text-change 이벤트 발생시에 setBody(innerHTML)을 통해 body를 업데이트합니다.
               body가 업데이트되어도 useEffect 발생 조건 인자([isError, mountBody])에 body가 없으므로
               QuillEditor 컴포넌트는 다시 렌더링되지 않습니다. 이는 입력 중 커서가 맨 앞으로 이동하는
               문제를 방지합니다. 대신 외부에서 body가 수정되어도 rerenderBody가 호출되지 않으면 변경된
               body가 적용되지 않습니다. */
      quill.on("text-change", () => {
        handleQuillChange(quill.root.innerHTML);
      });

      setIsLoaded(true);
    } else {
      /* quill.min.js가 로드되어 있지 않아 window.Quill이 undefined이면 isError가
               계속 변경되면서 재시도합니다. */
      setIsError((prevIsError) => !prevIsError);
    }
  }, [isError, mountBody]);

  return <div ref={quillElement}></div>;
};

export default QuillEditor;
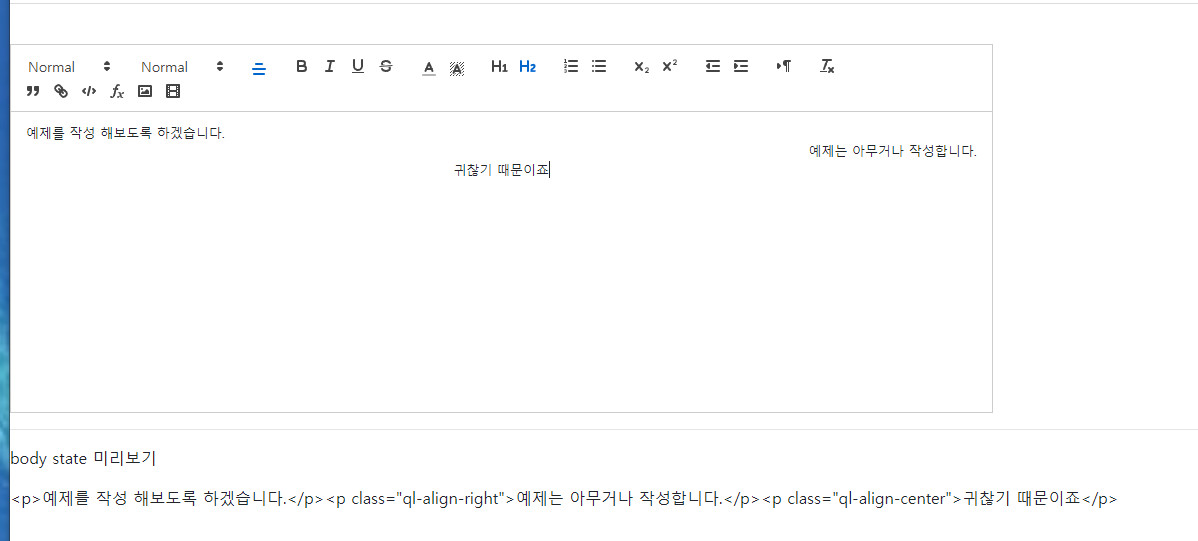
여기까지 진행하면 아래와 같은 화면이 만들어 진다.
728x90
'🧠 지식창고 > 기능' 카테고리의 다른 글
| [Next.js] 이미지 미리보기 (0) | 2022.03.24 |
|---|---|
| [Editor] String 형태의 HTML 렌더링 하기 (2) | 2022.03.23 |
| Zustand 사용하기 (0) | 2022.03.21 |
| [Recoil] 공식문서로 공부하기 (0) | 2022.03.17 |
| [Recoil] 예습 (0) | 2022.03.14 |


댓글