5주차 개인 과제
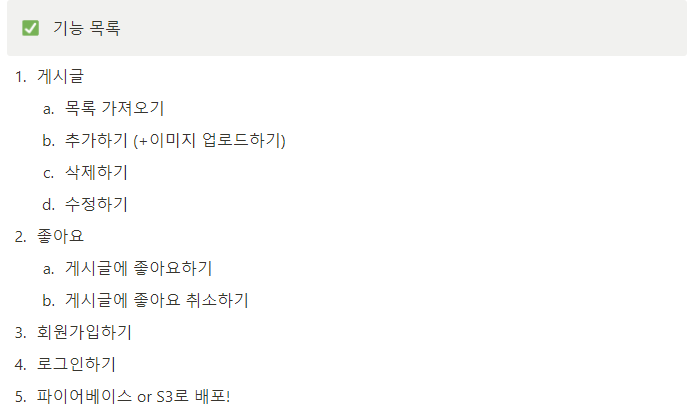
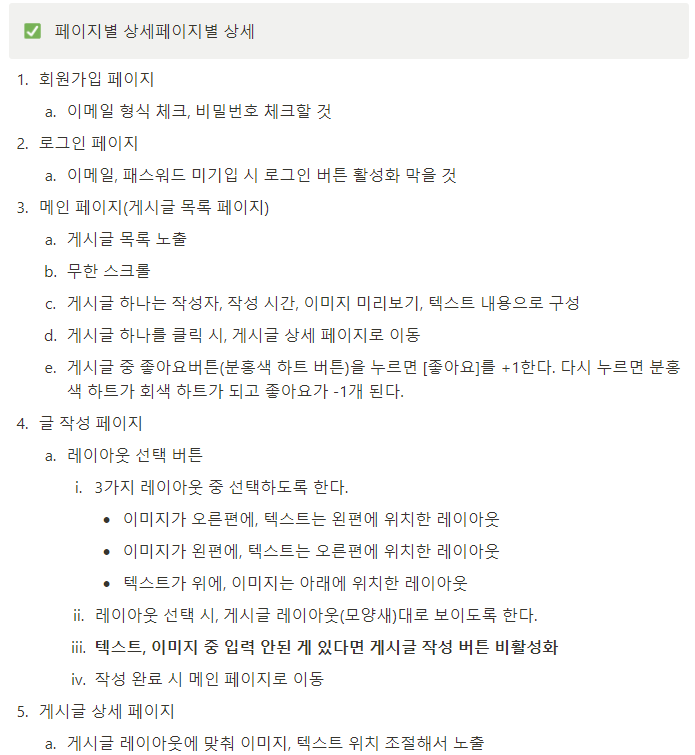
기능 목록


11월 29일

1주차 강의 듣고 들은 내용 활용해서 과제 수행했다.
11월 30일
2주차 강의 듣고, 로그인/회원가입 구현 + 로그인 유지 + 로그아웃을 구현했다.
12월 1일
3주차 강의 듣기 전에 어제 구현한 거에서 추가 할 건 없는 지 살펴보고
회원가입 시 이메일, 비밀번호를 입력하지 않았을 때 버튼이 비활성화 되도록 만들었다.
https://velog.io/@hyunjoong/react-button-%ED%99%9C%EC%84%B1%ED%99%94
TIL #18 react - button 활성화
react는 state를 통해서 초기값을 설정 하며this.setState()를 통해서 state의 값을 변경한다.this.setState() = 비동기 방식westagram 로그인 화면에서 input에 id에 @를 포함하고 password 길이가 5글자가 되면 로그
velog.io
-> src/elements/input.js에 onKeyUp 속성을 추가 해줬고
<InputBox type={type} placeholder={placeholder} onChange={_onChange} onKeyUp={_onKeyUp}></InputBox>-> src/elements/button.js에 className을 props로 바꿔서 styled 속성 지정 할 때 삼항 조건식 써줬다.
// Button.js

import React from "react";
import styled from "styled-components";
import { useHistory } from "react-router-dom";

const Button = (props) => {
  const { text, _onClick, className } = props;
  const history = useHistory();

  return (
    <React.Fragment>
        <Btn className={className} onClick={_onClick}>{text}</Btn> // ***
    </React.Fragment>
  );
};

Button.defaultProps = {
  shape: "notFull",
  text: "텍스트를 작성 해주세요",
  _onClick: () => {},
  className : "", // ***
};

const Btn = styled.button`
  width: 100%;
  height: 60px;
  color: white;
  border: none;
  background-color: ${(props) => (props.className === 'unActiveBtn' ? 'gray' : 'black')}; // ***
  margin-top: 10px;
  padding: 12px 0px;
  box-sizing: border-box;
  text-align: center;
`;

export default Button;
-> 위 사이트 보고 참고해서 만들었고 사이트에서 클래스형 컴포넌트에 초점을 맞추셨지만, 이 프로젝트에서는 함수형 컴포넌트를 사용하고 있어서 조금 변형 해줬고, checkValid 함수에서 이메일, 비밀번호, 비밀번호 체크를 확인 하도록 바꿨다.
// Join.js

import React from "react";
import '../shared/App.css'
import { Input, Button, Grid, Text } from "../elements";

import { useDispatch } from "react-redux";
import { actionCreators as userActions } from "../redux/modules/user";

const Join = (props) => {

  const dispatch = useDispatch();

  const [id, setId] = React.useState('');
  const [pwd, setPwd] = React.useState('');
  const [pwd_check, setPwdCheck] = React.useState('');
  const [user_name, setUserName] = React.useState('');
  const [active, setActive] = React.useState(false); // ***

  const join = () => {

    if(active===false){ // ***
      return;
    }

    dispatch(userActions.signupFB(id, pwd, user_name))
  }

  // 이메일, 패스워드 미기입 시 로그인 버튼 활성화/비활성화
  const checkValid = () => { // ***
    id.includes("@", ".") && pwd === pwd_check && user_name ? setActive(true) : setActive(false);
  }

  return (
    <React.Fragment>
      <Grid padding="16px">
        <Text size="32px" bold>
          회원가입
        </Text>

        <Grid padding="16px 0px">
          <Input label="아이디" placeholder="아이디를 입력 해주세요" _onChange={(e)=>{setId(e.target.value)}}></Input> // ***
        </Grid>

        <Grid padding="16px 0px">
          <Input label="닉네임" placeholder="닉네임을 입력 해주세요" _onChange={(e)=>{setUserName(e.target.value)}}></Input>
        </Grid>

        <Grid padding="16px 0px">
          <Input type="password" label="비밀번호" placeholder="비밀번호를 입력 해주세요" _onKeyUp={checkValid} _onChange={(e)=>{setPwd(e.target.value)}}></Input> // ***
        </Grid>

        <Grid padding="16px 0px">
          <Input type="password" label="비밀번호 확인" placeholder="비밀번호를 다시 입력 해주세요" _onKeyUp={checkValid} _onChange={(e)=>{setPwdCheck(e.target.value)}}></Input> // ***
        </Grid>

        <Button
          className = {active ? 'activeBtn' : 'unActiveBtn'}  // ***
          text="회원가입 하기"
          _onClick={()=>{join();}}></Button>
      </Grid>
    </React.Fragment>
  );
};

export default Join;
+ 3주차 강의 들으면서 게시물 작성, 수정, 이미지 업로드 시 미리보기 기능을 구현했고 추가로 알림 뷰까지 만들었다.
12월 2일
3주차 강의 기능 부분 정리하기 + 4주차 강의 듣기
12월 3일
알림 뱃지 기능, 좋아요 기능, 삭제 기능 만들었다.
12월 4일
배포함
https://imagecommunity-aabf8.web.app/
React App
imagecommunity-aabf8.web.app